Managing emails can be a time-consuming task, especially if you receive dozens (or hundreds) every day. In this tutorial, we’ll build an Email AI Agent using N8N that drafts replies automatically, waits for your approval, and sends or updates messages based on your commands.
This workflow is perfect for busy professionals, business owners, and automation enthusiasts who want to save time without losing control over their communication.
What You’ll Need
- n8n (self-hosted or cloud) : Click here to signup on Railway
- Gmail account connected to N8N
- An OpenAI API key (or other AI provider)
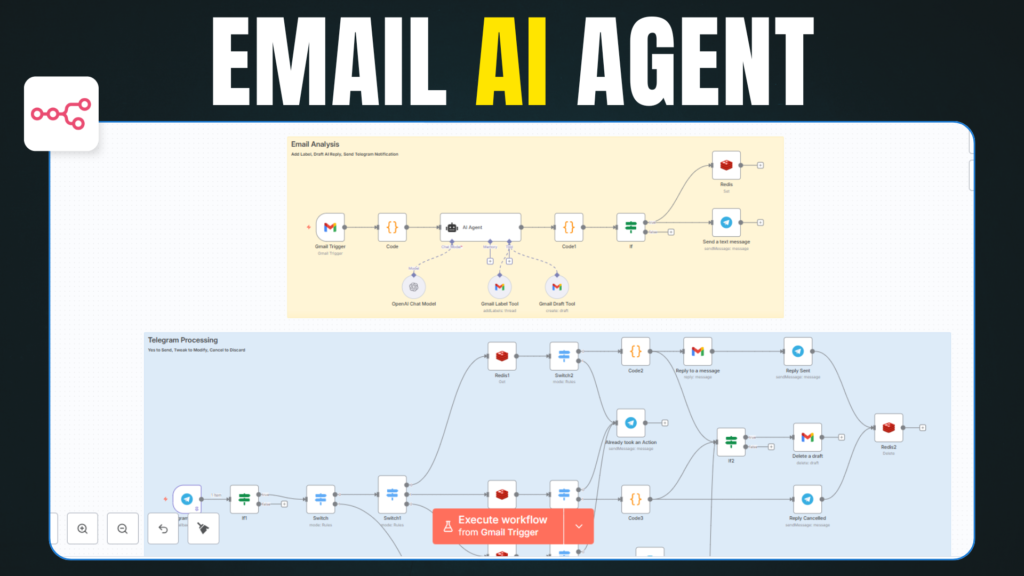
How the Workflow Works
- Receive an Email – n8n detects incoming messages via your connected email account.
- Generate a Draft – The AI node creates a reply based on the email content.
- Send for Review – The draft is sent to you on telegram for review.
- Wait for Your Command:
- “yes” → Sends the drafted reply immediately.
- “tweak” → Sends the draft back for edits.
- “cancel” → Stops the process.
- Based on your command it executes the step
JavaScript & System Message
- Gmail Output Cleaner Javascript
const items = [];

for (const item of $input.all()) {
  const json = item.json;


  const fromAddress = json.from?.value?.[0]?.address || '';
  const subject = json.subject || '';
  const message = json.text || '';
  const threadId = json.threadId || '';
  const labelId = (json.labelIds || []).find(id => id.startsWith('Label_')) || 'nil';

  items.push({
    json: {
      email_summary: {
        fromAddress,
        subject,
        message,
        threadId,
        labelId,
      }
    }
  });
}

return items;- Email Analysing AI Agent System Message
You are an intelligent email classification and assistant agent.

Analyze the following email and return a pure JSON object with:

1. "label" — One of:
   - Customer Support(Label_112345)
   - Invoice/Payment(Label_34335)
   - Job Inquiry(Label_343435)
   - Collaboration(Label_33232)
   - Uncategorized(Label_43223)
   - Urgent(Label_32323)

2. "reply_draft" — A polite, short reply (if needed). Use "null" if no reply is needed.

3. If the email is from a no-reply address (e.g., "no-reply@...") or social/media platforms (e.g., Facebook, Instagram, Twitter, LinkedIn, etc.), do not generate a reply. Set "reply_draft" as "null" regardless of content.

4. After identifying the label, use the label ID given in the brackets and call Gmail Label Tool to apply that label to the email — but do not add it if the email already has one label ID.

5. If a reply is created (i.e., "reply_draft" is not null), always call the Draft Email Tool and include a field called "draftID" in the output JSON with the value from the draft tool (e.g., "r-123456..."). Never omit "draftID" when a draft is generated.

6. Label the email as "Urgent" if it appears time-sensitive, includes deadlines, critical issues, or requests a quick response — even if urgency is implied.

7. All reply drafts should be signed off with:
Best,
 Rajeev

Important:
- Return only a valid JSON object.
- Do NOT include markdown, comments, wrappers, or explanations.
- Ensure that "draftID" is always included if "reply_draft" is not null.

Example Output:
{
  "label": "Collaboration",
  "reply_draft": "Thanks for your email. Happy to explore a collaboration. Let me know your availability.\n\nBest,\n Rajeev",
  "draftID": "r-123456"
}- Replace Label ID & Email signature with your own.
- AI Agent output cleaner Javascript
const rawOutput = items[0].json.output;

// Step 1: Remove markdown/code block wrappers
const cleaned = rawOutput.replace(/```json|```/g, '').trim();

// Step 2: Parse the cleaned string into a JSON object
let parsed;
try {
  parsed = JSON.parse(cleaned);
} catch (err) {
  throw new Error('Failed to parse Gemini response: ' + err.message);
}

// Step 3: Get subject, from, and message
const emailSummary = $node["Code"].json.email_summary || {};
const from = emailSummary.fromAddress || '';
const subject = emailSummary.subject || '';
const fullMessage = emailSummary.message || '';

// Step 4: Remove previous reply (if any)
const splitRegex = /On\s.+wrote:/i;
const message = splitRegex.test(fullMessage)
  ? fullMessage.split(splitRegex)[0].trim()
  : fullMessage.trim();

// Final output (without previousMessage)
return [{
  json: {
    ...parsed,
    from,
    subject,
    message
  }
}];
- Redis node value script
{{ JSON.stringify({
messageId: $node["Gmail Trigger"].json["id"],
  subject: $node["Gmail Trigger"].json["Subject"],
  draft_reply: $json.reply_draft,
  draftID: $json.draftID
}) }}
- Javascript for cleaning output from Redis ( “yes” input )
const raw = $json.Draft_Details;

let parsed;
try {
  parsed = JSON.parse(raw);
} catch (err) {
  throw new Error('Invalid JSON in Draft_Details: ' + err.message);
}

// Convert line breaks to <br> for HTML version
const html = parsed.draft_reply.replace(/\n/g, '<br>');

return [
  {
    json: {
      messageId: parsed.messageId,
      draft_reply: html,       // HTML version with <br>
      draftID: parsed.draftID
    }
  }
];
- Javascript for cleaning output from Redis ( “cancel” input )
const raw = $json.Draft_Details;

let parsed;
try {
  parsed = JSON.parse(raw);
} catch (err) {
  throw new Error('Invalid JSON in Draft_Details: ' + err.message);
}


return [
  {
    json: {
      draftID: parsed.draftID,


    }
  }
];
- Extracting Message ID from Tweak message
{{ $json.message.reply_to_message.text.match(/id:\s*(\w+)/)[1] }}- Draft modifying AI agent output cleaning javascript
const rawOutput = $json.output;

let parsed;
try {
  parsed = JSON.parse(rawOutput);
} catch (err) {
  throw new Error('Failed to parse JSON: ' + err.message);
}

return [
  {
    json: {
      messageId: parsed.messageId,
      draft_reply: parsed.draft_reply,
      draftID: parsed.draftID

    }
  }
];
- Save updated data on Redis
{{ JSON.stringify({
  messageId: $json.messageId,
  draft_reply: $json.draft_reply
}) }}
Key Advantages
✅ Saves Time – No more manually writing every reply.
✅ Keeps Control in Your Hands – You approve before sending.
✅ Scalable – Works for 10 or 100 emails a day.
✅ Persistent State Management – Redis ensures the workflow remembers your last action, even if n8n restarts.
Workflow Outline
- Trigger Node – Detect new incoming email.
- AI Node – Draft the response.
- Telegram Node – Send draft to you for approval.
- Wait for Response – Capture your reply (“yes”, “tweak”, “cancel”).
- Redis Node – Save/retrieve conversation state.
- Conditional Logic – Process based on your input.
- Email Node – Send final approved email.
🔗 Download Resources
• Download Workflow JSON File: Download
Example Use Cases
- Client support responses
- Sales inquiry follow-ups
- Internal team communications
- Personal inbox management
Final Thoughts
With this Email AI Agent, you get the perfect balance between automation and control. The AI saves you time drafting responses, while you still approve the final send — ensuring accuracy and tone.
If you want to see the step-by-step setup in action, check out our video tutorial here: